
OUR PHILOSOPHY
Quality Meets Precision
At Ceramic Fashion Studio (CFS), we believe that exceptional spaces are not created by product selection alone. The precision of installation, the discipline of maintenance, and the quality of workmanship are equally critical in translating your vision into reality.
Evolving Material Standards
We work exclusively with porcelain and vitrified tiles that meet the highest industry standards. Each product is carefully selected for its durability, aesthetic appeal, and advanced surface properties.
Advanced Manufacturing Precision
Modern porcelain surfaces are manufactured using sophisticated processes traditionally associated with natural stone, including rectification, honing, and polishing.
Refined Installation Possibilities
These advancements enable refined installations with minimal grout joints, multi-size formats, trims, and intricate design compositions—while simultaneously demanding a higher level of professional execution.
Key to Installation Excellence
The Foundation for Surface Longevity
Follow these essential principles for the installation and maintenance of CFS tiles to ensure enduring performance and lasting aesthetic excellence.
Surface Preparation
A flawless installation begins long before the first tile is laid. Proper site readiness ensures structural stability and long-term performance.
- Ensure the substrate is clean, dry, level, and structurally sound.
- Remove all dust, grease, paint residues, and loose particles.
- Fill cracks and level uneven areas using appropriate compounds.
- Allow new concrete to cure adequately (minimum 28 days).
- Prime porous surfaces to enhance adhesive bonding.
- Acclimatize tiles, adhesives, and installation materials within the project environment for 24–48 hours prior to installation to stabilize against temperature and humidity variations.
- Conduct a preliminary dry layout to visualize the final composition, optimize tile distribution, and minimize material wastage.
- Mark reference lines to guide accurate placement and alignment throughout the installation.
Adhesive Selection
The choice and application of adhesive play a decisive role in bonding strength and installation durability.
- Use high-quality adhesives suitable for tile size, body composition, and substrate conditions.
- Select adhesives carefully in consultation with the manufacturer or supplier for specific applications.
- Mix adhesive strictly according to the manufacturer's specifications.
- Apply evenly using a notched trowel of appropriate size.
- Maintain uniform adhesive thickness to ensure full contact and prevent lippage
- Work in controlled sections to prevent the adhesive from drying prematurely.
- Use professional-grade tools and cutting equipment to ensure precision, efficiency, and installer safety.
Spacing & Layout
Thoughtful planning ensures both aesthetic harmony and technical accuracy.
- Use tile spacers to maintain consistent grout joints (typically 2–3 mm).
- Plan layouts to minimize cuts while achieving symmetry and visual balance.
- Begin installation from the center, where appropriate, for a proportionate appearance.
- Maintain expansion joints along perimeters and at specified intervals to accommodate structural movement.
- Check alignment continuously using spirit levels, straight edges, or laser guides.
- Install tiles methodically in logical sections, completing one area before progressing to the next.
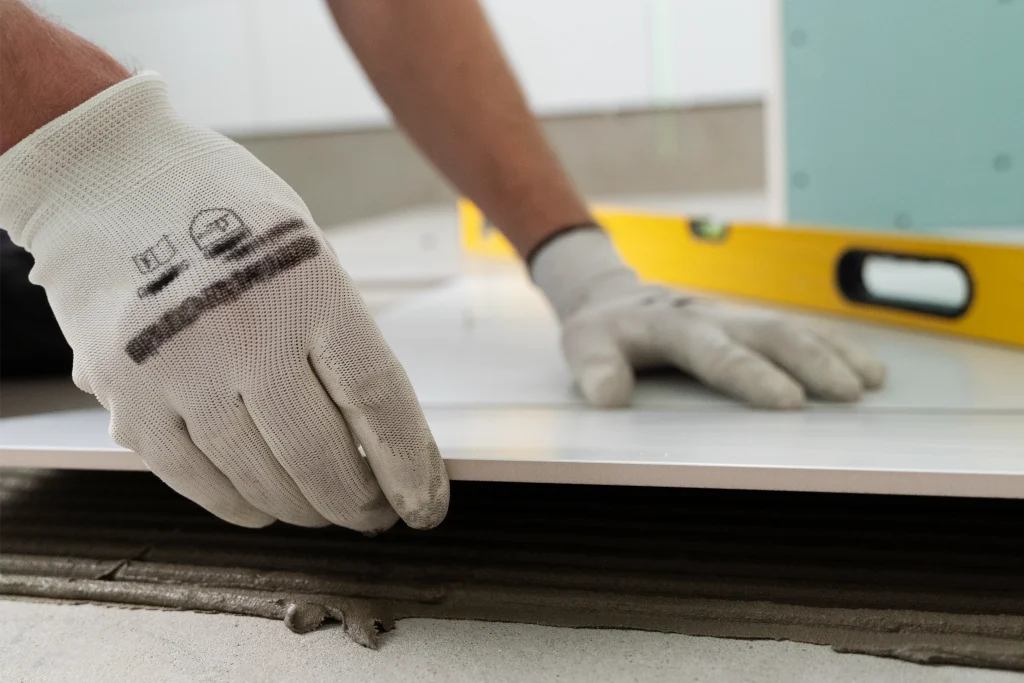
Leveling & Setting
Precision during placement ensures a refined, professional finish free from surface irregularities.
- Press tiles firmly into adhesive using a slight twisting motion to achieve full bonding.
- Use professional levelling systems to maintain a perfectly flat surface plane.
- Monitor and correct lippage between adjacent tiles during installation.
- Maintain expansion joints along perimeters and at specified intervals to accommodate structural movement.
- Remove excess adhesive from joints before it cures.
- Protect freshly installed surfaces from foot traffic, moisture, and debris during the curing period.
- Allow adequate curing time prior to grouting (minimum 24–48 hours).
Installation Do’s and Don’ts
Avoid common mistakes and follow these essential guidelines for successful tile installation.
Do's
- Always wear safety glasses and gloves during installation
- Check each tile for defects before installation
- Use appropriate safety equipment when cutting tiles
- Allow adhesive and grout to cure fully before use
- Seal grout lines in wet areas for added protection
- Follow manufacturer recommendations for all materials
- Test adhesive bond strength on small area first
Don'ts
- Never install tiles over unstable or damaged substrates
- Avoid installing in extreme temperatures (below 5°C or above 35°C)
- Don't rush the curing process - patience ensures durability
- Never use excessive water when cleaning during installation
- Avoid walking on freshly laid tiles before adhesive sets
- Don't ignore expansion joints - they prevent cracking
- Never use acidic cleaners on natural stone or unglazed tiles
- Avoid installing tiles without proper waterproofing in wet areas
The Importance of Grouting

Technicality
Grouting is not merely a finishing element — it is a critical structural and aesthetic component of tile installation. Proper grout joints accommodate manufacturing tolerances, thermal expansion, and substrate movement, ensuring long-term durability and visual harmony.
Joint Specification
For rectified materials, a minimum grout joint of 2 mm is required to compensate for inherent dimensional tolerances. Joint less installations are strongly discouraged, and no responsibility can be assumed for installations executed without grout joints.
Aesthetic Harmony
While coloured pigments may be used to achieve specific design intentions, it is advisable — particularly for rustic products with textured, wrinkled, or honed surfaces — to conduct a preliminary cleaning test prior to full application. The use of grout colours that create strong contrast with the tile surface (for example, dark joints on light floors) is generally not recommended for natural stone or honed finishes, as it may compromise the intended aesthetic outcome.
Final Touch
Immediate cleaning of the surface following grouting is essential to prevent residue formation and to ensure a refined final appearance.
Best Grouting Practices
- Choose grout colour carefully and in harmony with the tile finish
- Mix grout to the correct consistency according to manufacturer specifications and apply at approximately a 45-degree angle to ensure complete joint filling, remove excess promptly with a damp sponge.
- Even when tiles appear clean, neglected grout lines can diminish the overall appearance of the surface. Due to its porous nature, grout can absorb grease and dirt over time and therefore requires periodic cleaning.
- Clean grout lines regularly by mixing bicarb soda and water into a mild paste and apply it along the grout joints. Allow this to rest for a few hours, then scrub gently with a nylon brush. Rinse and seal afterwards to protect the grout.
Long-Term Care for Different Tile Finishes
Each tile finish requires specific care techniques to maintain its unique characteristics and beauty over time.

Glossy Tiles
- Clean with pH-neutral cleaners to maintain shine
- Use microfiber cloths to prevent scratching
- Avoid abrasive scrubbers that can dull the surface
- Buff dry after cleaning for streak-free finish
- Polish occasionally with specialized tile polish

Matt Tiles
- Use gentle cleaners designed for matt surfaces
- Avoid wax-based products that create unwanted shine
- Clean spills promptly as matt surfaces can show stains
- Use soft brushes for textured matt finishes
- Seal grout lines regularly to prevent discoloration

Textured Tiles
- Use soft-bristle brushes to clean grooves and patterns
- Steam cleaning works well for deep texture cleaning
- Pay extra attention to recessed areas where dirt collects
- Rinse thoroughly to remove cleaner from crevices
- Apply protective sealers for easier maintenance

Designer Tiles
- Clean gently to preserve printed designs
- Avoid harsh chemicals that may fade colors
- Use pH-neutral cleaners specifically for printed tiles
- Protect from prolonged direct sunlight exposure
- Test any new cleaner on inconspicuous area first
Stain Removal Tips
Quick reference guide for treating common stains on ceramic tiles effectively and safely.
Coffee, Tea, Wine
Solution: Wipe immediately with a damp cloth. For dried stains, use a baking soda paste or mild alkaline cleaner. Rinse thoroughly.
Grease & Oil
Prevention: Use splash guards in kitchen, clean cooking areasthe regularly.
Hard Water Deposits
Soap Scum
Rust Stains
Mold & Mildew
Solution: Apply bleach solution (1:10 with water) or specialized mold remover. Let sit 10-15 minutes, scrub, rinse thoroughly.
Installation & Care Resources
Explore detailed technical documents crafted to support proper installation and long-term care of CFS products. From surface preparation to maintenance practices, these guidelines are designed to help professionals deliver precision and lasting quality.


Disclaimer
The installation and maintenance guidelines provided in this document are intended as general recommendations based on industry best practices and CFS’s extensive experience with porcelain and vitrified tile products.
While we strive to provide accurate and helpful information, these guidelines should be considered as suggestive only. Every installation project is unique and may require specific methods depending on site conditions, substrate quality, tile specifications, environmental factors, and applicable local building codes.
We strongly recommend consulting certified tile installation professionals, following manufacturer-specific instructions for all setting and auxiliary materials, and adhering to relevant industry standards for your specific application. Nothing in these guidelines shall be considered a substitute for proper surface preparation, skilled workmanship, and execution under the supervision of qualified experts.
CFS shall not be held responsible for any damage, defects, deterioration, or performance issues arising from improper installation, incorrect material selection, inadequate site conditions, lack of professional supervision, or failure to follow standard installation and maintenance practices. The responsibility for correct installation, cleaning, and ongoing care rests solely with the installer and the property owner.
For optimal results and to protect your investment, always engage qualified professionals for installation and follow their expert guidance for maintenance and care. Upon installation, the material shall be deemed accepted, and no claims will be entertained thereafter.
— Team CFS
@ceramicfashionstudio

Craft Your Signature Space With Us
Collaborate with masters of architectural surface artistry.